3 Tips for Taking Photos in Every Part of Hawaii
Hawaii is a uniquely photogenic part of the world, with its natural beauty and diverse landscapes. Landforms range from ocean to mountains, with beaches, jungles, and volcanoes in between. Here are some tips on creating unique landscape images, from beach photography to mountain photography, and more.
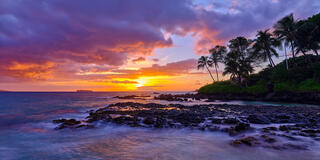
The Beach

A very special sunset at a very special Secret Beach. I captured this one with a polarizer to really bring out the color in the sky and what a special, iconic scene
Collector's Edition of 50
1. Shoot During the Golden Hour
Experienced nature photographers are poised and ready to capture breathtaking shots one hour after sunrise and one hour before sunset. These timeframes are known as the Golden Hour - when the warm orange and pink hues are most pronounced. In Hawaii, the beaches are far less crowded at sunrise and sunset, giving you the best chance for a tourist-free shot. If you’re purely there for nature photography, try to find out-of-the-way beachside accommodation and you’ll be even more likely to catch an empty vista without footprints marring the sand.
2. Utilize Color
Don’t limit yourself to white sand and blue ocean. Incorporate the surrounding fauna or geological formations for unique color palettes, from soft pastels to bold tones. Hawaii has black sand beaches which are a challenge to photograph but spectacular if done right.
3. Try Different Shutter Speeds
When creating the typical beach shots, play around with your shutter speed to increase or decrease how bright the sand will be when reflecting light. When photographing waves crashing on the beach, use a high shutter for a sharp image that freezes the wave and sea spray, or try a slower shutter speed for a smoother, slightly blurred image that conveys the motion of the wave.
The Jungle

This pathway takes you on a magical journey through this amazing enchanted forest. One of the most amazing places I've been to on the island of Maui, I felt I needed to capture the path itself to take you into this scene.
Collector's Edition of 100
1. Bring Your Zoom
Don’t forget your zoom lens for jungle photography! It’s always better to catch jungle flora and fauna from afar to get the most true-to-life image. Many areas are fragile, and when you’re following your shot you may not always watch where you’re stepping. Avoid startling the animals by keeping back, quiet, and still.
2. Use a Diffused Flash
This will provide extra light in your photos while not upsetting the natural lighting of the environment around you. This is especially true for dusk or dawn shots, which is generally when many animals are at their most active.
3. Play with Depth of Field
Use a shallow depth of field when you want to put the focus on a specific subject. This will blur distracting background elements. Experiment with medium range depth of field to give your jungle photos immersive depth and create layers. A popular method to do this in forests is to frame your shot with a few leaves, a reflection in a stream, or boulders.
The Ocean

A super fun angle I was able to capture here where it appears as if the turtle is taking a selfie. One of my most popular underwater images
Collector's Edition of 50
1. Get Close
Underwater and ocean images can be difficult to capture, but they are incredible when you get it right. Light diffuses in water, so the closer you get to the subject matter the clearer the light and photo will be. This is also important for underwater images, as the housing reduces the capability of your zoom unless you have a zoom gear. Keep in mind that fully sunny days are much better for underwater photography. You can also sometimes use a red film to offset the color of the water.
2. Shoot Upward
Don’t forget to shoot up! Capturing the expanse of the ocean above is often better than the sea floor, especially in areas lacking visual interest, like a sandy bottom instead of coral. This is easier when diving, but can be done while snorkeling or freediving.
3. Use Filters
Filters are incredibly useful for ocean photography, especially when capturing waves or seascapes from the shore. A neutral density filter will modify the intensity of the wavelengths and give you more control over the shutter speed. A polarizing filter will help reduce glare and enhance the true colors of the ocean and the sky.
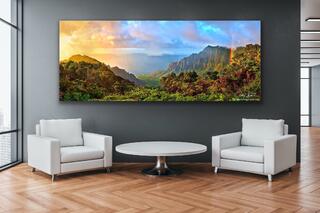
The Mountains

Kalalau Valley on the island of Kauai is one of the most special places on Earth to me. Just absolutely breathtaking and if you could imagine what heaven must look like, well I think it'd look like this
Collector's Edition of 50

1. Composition is Key
With mountain photography, pay special attention to the composition. The layout of a mountainscape is often what makes it most beautiful. Try to follow the Rule of Thirds to position the subject of your photo. Enable your camera's grid lines to help with your composition.
2. Try Different Focal Lengths
With such a large scale, you can use different focal lengths to find the best angle for your shot. Go wide angle if you’re far off and want to capture some of the surrounding area. A longer focal length for a zoomed-in image of a peak can be nice, especially if the lighting is good.
3. Include the Foreground
The foreground helps to complete the scene, add depth, and convey the scale of the mountain. When photographing mountains in Hawaii, try including some of the beach or ocean in the foreground.
The Volcanoes

One of the most epic scenes that I've ever witnessed, lava entering the ocean with the pacific crashing against it in opposition is just truly amazing! You literally have fire and water opposing each other here so it's a battle of two forces
Collector's Edition of 50
1. Safety First
When doing volcano photography, always put safety first. Only get close to a volcano when it’s safe to do so. This is where utilizing a telephoto zoom lens is a great idea, especially if a volcano is quite active.
2. Experiment with Shutter Speeds
To catch the action of a moving volcano, use a faster shutter speed for more precise and spectacular photos. To create motion and emphasize the flow of the lava, use a slow shutter speed. If you’re able, bring a tripod for the steadiest shot.
3. Plan Ahead
Don’t forget your pre-planning. Volcano terrain is hot and rough. Be sure to bring plenty of water and wear rugged shoes or hiking boots. Consider planning your trip just after sunset or even at night to capture images of the bright red, orange lava. Your time may be limited at a volcano, depending on the weather and how busy the national park is, so have an idea of what you'd like to photograph before you get there.
What are you waiting for?
I know, you’d be here tomorrow if you could! These beach photography tips will improve your images and help you capture Hawaii at its best.
For all types of landscape photography, it's important to have an idea of what you want to photograph before you go, how you’ll set up the shot, what time of day you need to be there, and what equipment you need to have along.
Can’t make it to the islands? Check out how to choose the perfect Hawaii landscape photo for your wall.